ZiptieAI is my intelligent AI drone project and the (important) documentation I created along the way. There are 4 main URLs:
- ziptieai.com. This website. Built with Jekyll on Github pages.
- docs.ziptieai.com. A very minimal documentation website (built with ReadTheDocs/Sphinx). The docs site basically mimics the structure and content of the wiki pages , but in an easier to read format. I will gradually fill this site with more detailed information gleaned from the docx’s (word files) on my Google drive.
- Wiki. The first place to look for udpated project info.
- Google drive. A lot of detailed .docx files (details are everything for this project). I am working alone without (human) assistance, so accurate, useful documentation is critical. Note: These docs are currently more like lab notes, not finished docs. When learning the tech, it’s very important to jot down as many details as possible, so that if needed, you can go back and figure out where you made a mistake. The plan is to eventually “distill” the useful content (and delete the chaff).
The inspiration for “Ziptie” drones
The original idea for the “Ziptie” part of “ZiptieAI” came from the zipties the Ukrainian army uses for their very flexible and mission ready drones.
- KISS (“keep it simple stupid”). Needless complexity is your biggest enemy.
- Implement the minimal functionality to get the job done.
- “Ziptie” (add) any required functionality. Be flexible and ready to change parts as required. This approach is critical for those of you building your first drone(s) at home.

My first build validates the Ziptie approach for new drone builders (like me)
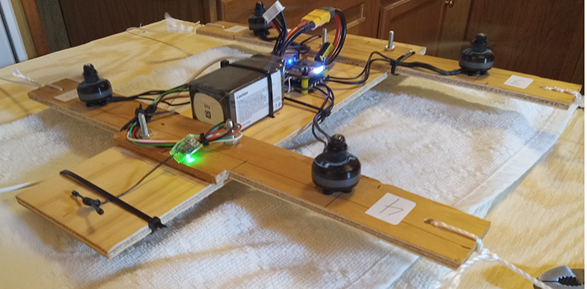
The “Ziptie” approach was critical for building my first drone, a minimalist setup with a plywood frame that was flight tested on my kitchen work table (photo below).
This is the way to build your first drone. Why?
- The experts sometimes overload you with (1) too much functionality and (2) not enough details (hey, they’re experts, its hard for them to come down to our level). I focused on one thing: Getting the xxxx thing in the air. The first version had no camera, VTX, GPS, etc.
- Getting into the air indoors (on your workbench) is great for testing (just like wind tunnel testing). WEAR SAFETY GOGGLES. Getting all the channels on the RC (the controller with sticks) working is a major challenge for newcomers (a challenge that most expert bloggers conveniently omit in their “it’s easy to get started” videos). I had some strange arming problem, and temporarily solved it by using a USB connection to arm the drone from my PC.
- Trying to scrunch all the components together on some little carbon fiber frame is (1) too difficult, (2) can cause mistakes (broken connections, etc), (3) makes it very difficult to debug problems, and (4) makes it difficult to make modifications.
- The extra weight of the plywood and the bad aerodynamics of the fat plywood arms will reduce performance (and stability? :) ) of the copter, making it less likely to get out of control on your first flight (crashing is bad, but losing control of a copter is much worse).
It turned out that this approach saved me a lot of trouble. The SpeedyBee F405 FC/ESC has a reputation for quality issues (Amazon warns that its a product that is often returned). I could not get the motors to spin. I thought maybe I had ruined my ESC’s because I first plugged in a 6S battery (24V) before I realized that you had to used 4S (16V) (batteries are one of those critical and even dangerous details the experts tend not to mention). OK, maybe this is not a problem, but I did not know for sure. I was ready to just order a new ESC, but first I decided to probe around. I discovered that the plastic housing of a female connector (between the FC and ESC) was defective (the hole was badly formed). It had caused a pin (GND) to be bent (yet the connector still went all the way in), possibly causing a short with a neighboring pin (the connectors are fragile and tiny). I used some very small tweezers to hack around on the plastic connector, and … wow, it worked.
I was able to try hacks like this easily because my parts were not all scrunched up together.
I documented what I did, but the docs are more like lab notes, not end user docs. I plan to eventually clean them up. In any case, for the details of the problem above:
- Open https://drive.google.com/drive/folders/1WlY6zvOpCwWWgh_mhLvZRCXwSPR9WZ7B
- Download and open 4.5a-01_CONFIG_SBEE_BF_brodie_v07_24.0414.docx
- Search for “problem discovered”
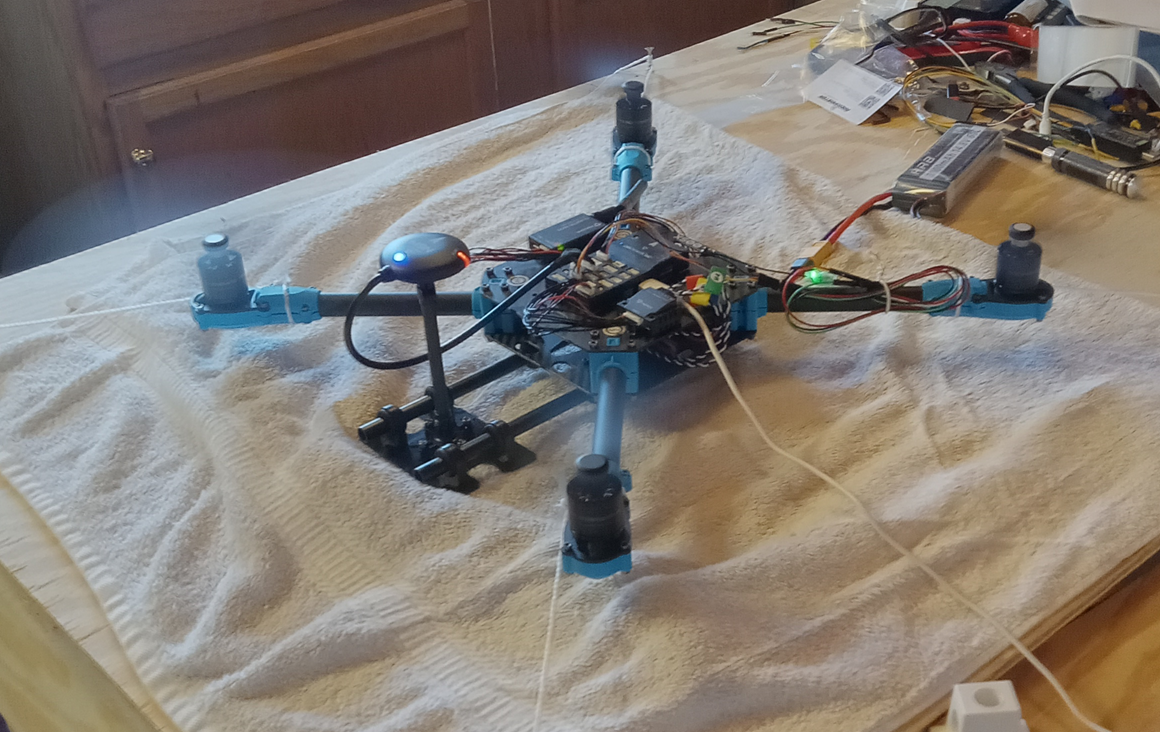
My second build also validates the Ziptie approach
The second build was an x500 with PX4 on 24.0505. I spent over a week trying get it flying with Ardupilot, but could not get the motors to spin (I also tried Ardupilot on the plywood drone, and again everything worked except for the motors). With PX4 it took one day.
This is why you need to be flexible. Ziptie together whatever components and software you need to get the job done. I had heard all this great stuff about Ardupilot, and the sheer amount of functionality Ardupilot provides is impressive. So I rather surprised by (1) the low quality of the docs (I have seen pages that I believe were 10 years old) and (2) the difficulty of configuration (Mission planner is quite a challenge). I will try to tackle Ardupilot later, but for now I am sticking with PX4 (I recommend PX4 over Ardupilot to any newcomer).
The evolution of the drone project
I started this project in late 2023 with no assistance, some basic AI experience, and no experience with drones. My learning approach:
- Find anything that you can get working. Search everywhere (Youtube, Google, etc).
- Get help from Youtube, Stack Overflow, and Google search (without these sources, it would be impossible to do this yourself).
- Document as much as possible (see the Google drive).
- Constantly update the plan and concepts (see the Wiki).
The following table summarizes the project stages:
| Project stage (Wiki “part”) | Activities |
|---|---|
| Part 1 Simulation | Total simulation (of the drone, world, camera, etc) |
| Part 2 AI on CC | AI on a companion computer (Nano, PI4/5) or Ubuntu PC focusing on object recognition / detection |
| Part 3 Real FC | Simulation again, but using a real FC |
| Part 4 Basic platform build | Building a Pixhawk (large Holybro X500) drone and an FPV (small SpeedyBee) drone |
| Part 5 Mission platform tech | STM32 tools, FC FW dev / API’s, ROS, and stealth (wired) |
| Part 6 Mission platforms | Specific mission platforms (such as mine clearance, target lock-on) |
Part 2: Types of AI apps / companion computers
Wiki part 2 (AI HW) focuses on AI on companion computers. If you aren’t into AI, then skip this part. My real focus (at least at first) was AI. I just wanted to use a simple quadcopter as a platform for the AI equipment. I will (in the near future) summarize the AI app / CC combinations tested in a table like the following.
| CC | AI algorithm | Camera/driver |
|---|---|---|
| Jetson Nano | xxx | xxx |
| PI4 | xxx | xxx |
| PI5 | xxx | xxx |
Part 3: FC HITL (hardware in the loop)
Wiki part 3 (HITL) shows how to test a real FC with everything else simulated. Most newcomers would want to skip this part.
Part 4: Basic platform build
Wiki part 4 (Basic platform build) focuses on the FC/firmware combinations shown below (with status).
| Firmware | Pixhawk (6c) | FPV STM32 (SBee F405v3) |
|---|---|---|
| Ardupilot | (almost) | (almost) |
| PX4 | Working | |
| Betaflight | Working | |
| INAV | Working |
Part 5: Mission platform tech
Wiki part 5 (Mission platform tech) focuses on extra mission platform tech such as STM32 tools, FC firmware dev and APIs, ROS, and stealth (wired) pilot-drone communication.
Part 6: Mission platforms (future)
Wiki part 6 (Mission platforms) will (future) focus on real-world mission platforms. Something like the following.
| Mission | Basic platform | AI components | Additional tech |
|---|---|---|---|
| Mine clearance | X-500 + PX4 | Infrared + (??) | (??) |
| Target pursuit | 7-inch FPV + INAV | PI5 + Haarcascades | (??) |